Monday, December 22, 2014

Setting up a Continuous Integration Environment with Jenkins and Docker PART 3 Jenkins Job Setup


In part three of my continuous integration project I'll be completing the Jenkins setup.  I will show how to create a new job, install plugins, and setup credentials to connect to the Git repository we created in Part 2. 

Lets return to the Jenkins server. We previously installed the Java run time environment but we didn't install the JDK development environment.  You can skip this step if your project is not a Java project. 

Step 1) Install the JDK we forgot when creating the Jenkins server> yum list available  | grep java-1.7
java-1.7.0-openjdk.x86_64          1:1.7.0.71-2.5.3.2.el6_6       updates
java-1.7.0-openjdk-demo.x86_64     1:1.7.0.71-2.5.3.2.el6_6       updates
java-1.7.0-openjdk-devel.x86_64    1:1.7.0.71-2.5.3.2.el6_6       updates
java-1.7.0-openjdk-javadoc.noarch  1:1.7.0.71-2.5.3.2.el6_6       updates
java-1.7.0-openjdk-src.x86_64      1:1.7.0.71-2.5.3.2.el6_6       updates

> yum install java-1.7.0-openjdk-devel.x86_64
... lots of output ...
Is this ok [y/N]: y

Step 2) Lets not forget git
> yum install git
... lots of output ...
Is this ok [y/N]: y

Step 3) Create the SSH key pair for the Jenkins user.
The yum install of Jenkins sets the Jenkins user shell to /bin/false, thus  is unable to su directly to the jenkins user. Running the following command will generated the ssh key pair for the Jenkins user.

> sudo -u jenkins ssh-keygen

Add the Git repository server to the knows_hosts file for the Jenkins user, answer yes to the question. 

> sudo -u jenkins ssh git@10.52.188.97
The authenticity of host '10.52.188.97 (10.52.188.97)' can't be established.
RSA key fingerprint is 7c:e6:3d:18:c1:0a:6e:f6:1d:7c:96:f4:f5:c3:da:a5.
Are you sure you want to continue connecting (yes/no)? yes
Warning: Permanently added '10.52.188.97' (RSA) to the list of known hosts.
Last login: Thu Dec 18 13:57:18 2014 from 25.16.76.152

Step 4) Add some plugins to Jenkins
First lets navigate to our Jenkins instance, then select;  
       manage Jenkins --> --> Manage Plugins --> Available Tab
Select the following Plugins.

  • Git Plugin
  • Git Client Plugin
  • Git Parameter Plugin
  • git-notes Plugin
  • git tag message Plugin
  • Green Balls "Changes Hudson/Jenkins to use green balls instead of blue for successful builds
Select Download now and install after restart


STEP 5) Setup Credentials.


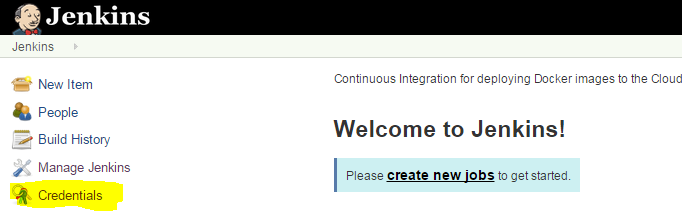
Select Credentials


Select Add Credentials


Select Global Credentials
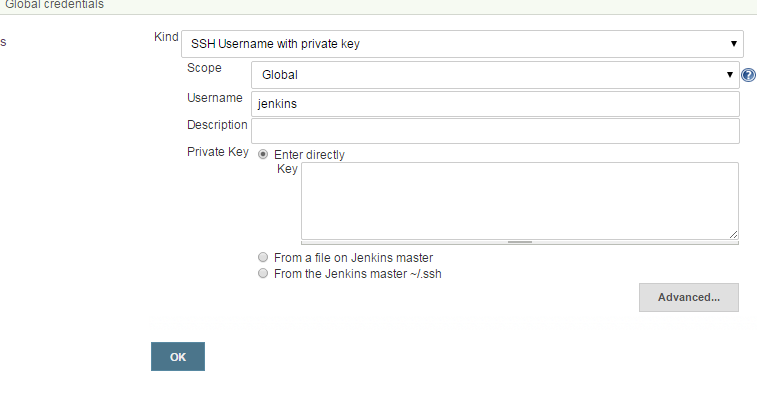


Select SSH Username with private key, then paste the Private key you created above into the Key field.


STEP 6) Jenkins Configure System
Return to Jenkins HOME then Select Manage Jenkins --> Configure System.

       a) Scroll down and add a JDK installation.
Give it a name, then set the JAVA_HOME location (/usr/lib/jvm/java1.7.0-openjdk.x86_64)


       b) Add a Maven installation.


       c) Add a Git Installation


Step 7) Create a Jenkins job
Since every project will be different I will leave it up to you to configure your Jenkins job to compile and package your app. I will be revisiting this in a future post when I create the Docker Image.


Monday, December 15, 2014

Setting up a Continuous Integration Environment with Jenkins and Docker PART 2 Git Repository

In part two of my continuous integration project I'll go over the steps required to setup a GIT server to host git repositories, as well as initial repository creation and importing the first project. In part 1 of this series I created 4 CENTOS 6.6 Linux servers, with one designated for the GIT repository server. There are two methods to connect to a GIT repository ssh and https, this project requires ssh so in this article we will discuss ssh. This is not a GIT tutorial there are plenty of good GIT tutorials elsewhere on the web. 

Step 1) Install Git

> yum install git
---> Running transaction check

---> Package git.x86_64 0:1.7.1-3.el6_4.1 will be installed

...lots of output...

Is this ok [y/N]: y

...lots of output...
Complete!

Step 2) Create a user and group named "git"

The groupadd command will create a new group, with the next available group id in the /etc/group file.  The useradd command will create the home directory for the git user, the default location is the /home directory. The repository can be anywhere that the git user has write privileges such as  /data, /opt or /usr/local/git depending on your personal preferences.


> groupadd git
> useradd –d /home/git –g git –s /bin/bash –c”Git Repo User” git
> passwd git
Password: <password>
Re-enter password: <password>

Step 3) Setup ssh access.

Git clients (your developers) will be connecting to this git server using ssh keys, we must create the authorized_keys file to hold the clients public keys. 

> su - git
> mkdir .ssh 
> chmod 700 .ssh
> touch .ssh/authorized_keys
> chmod 600 .ssh/authorized_keys

Step 4) Create an empty repository replacing <project> with the name of your project.

As the git user
> cd /opt/git
> mkdir <project>
> cd <project>
> git init --bare
 git init --bare

Initialized empty Git repository in /opt/git/project/

Step 4) Creating a private / public ssh key pair.

Before you can grant access to your GIT repository you will need to gather your developers public keys. Here are a couple of methods for creating a ssh key pair. It does not matter what method you use to generate your key pair as ssh keys are truly portable over all platforms.

LINUX:
> ssh-keygen -t rsa
   Generating public/private rsa key pair.
   Enter file in which to save the key (/home/pete/.ssh/id_rsa):
   Created directory '/home/pete/.ssh'.
   Enter passphrase (empty for no passphrase):
   Enter same passphrase again:
   Your identification has been saved in /home/pete/.ssh/id_rsa.
   Your public key has been saved in /home/pete/.ssh/id_rsa.pub.
   The key fingerprint is:
   8d:73:54:cb:ae:b6:96:e5:ff:c0:65:38:12:b8:42:d9 pete@myserver.lab.net


>  cat .ssh/id_rsa.pub
ssh-rsa AAAAB3NzaC1yc2EAAAABIwAAAQEAzng5JGKNLHFap6R5L6IOItG04WydGaxDIHM80AQNAdFVqjbU4QX4Z66UfmGR7l2Dit5ouoLWOMMrI3Qh0hXzsRooQLPYKbEtq/mWJvhcPCReURKFjiE+Po62AaGs9xHz/tl6D15/vOtFeOza4Z6ECkHgPGCJdmhXAib2/5IJgBMhop67TFwbDOc0JmMOB9y/1yIrd+nsmaYTy/OZVFNddFywB8XZ9JaCB/HVeGajzXdc8WdMKIODExHMzEcddHZq9sTt5pPEXRPmED0SMs0r+X9Kn+zTj0OPtQwWOyxxfCko7OnxBQL+kec8Ypl1xWVrqHImI8Xhs1UZdUsVCU6pww== pete@myserver.lab.net

Using Puttygen on windows:
Download puttygen from  here, generate your private/public key and save them, to C:\users\username\.ssh


Select Generate                                                 Save private/public keys.


Step 5) Enabling access to the repository

To use the new repository we need to add developer SSH public keys to the authorized_keys file located on the GIT repository server. It is as simple as appending each developers public key to the authorized_keys file. Your developers will need to send you your their public key. 

If your developers have emailed you their public key you can simply cut and past the text file into your authorized_keys file. Otherwise if you have saved them locally you can do something similar to the following.

> cd /home/git
> cat /tmp/id_rsa.pete.pub  >> .ssh/authorized_keys


Step 6) Connecting to the GIT repository, and importing your project.

There are many tools that can be used to connect to the GIT repository from a Windows client, including the plugins for Eclipse, TortoiseGit, cygwin, or the git bash command line. Many developers I've worked with have used the command line and the Eclipse IDE to develop their code.  For this tutorial I'll be using the git bash command line. Make sure you've installed a GIT client, and replace <GitServerIP> with the IP or domain name of your GIT server.

On the client system;
    The following steps assume that you actually have files or code or anything else you want already in your project directory on the client system.

Test your ssh connection to the GIT server, this will log the client into the GIT server. Obviously giving the client user access to a shell prompt on your GIT server is probably not a good idea.   Refer to this reference for how to restrict access. 
> ssh git@<GitServerIP>

The authenticity of host '10.11.12.13 (10.11.12.13)' can't be established.
RSA key fingerprint is 7c:e6:3d:18:c1:0a:6e:f6:1d:7c:96:f4:f5:c3:da:a5.
Are you sure you want to continue connecting (yes/no)? yes

Warning: Permanently added '10.11.12.13' (RSA) to the list of known hosts.
$ exit


> cd project
> git init
Initialized empty Git repository in /home/pete/project/.git
> git add .
> git commit -m 'First Commit'
> git remote add origin git@<GitServerIP>:/opt/git/project
> git push origin master
Counting objects: 49, done.
Delta compression using up to 4 threads.
Compressing objects: 100% (39/39), done.
Writing objects: 100% (49/49), 15.32 KiB | 0 bytes/s, done.
Total 49 (delta 1), reused 0 (delta 0)
To git@10.11.12.13:/opt/git/contacts
 * [new branch]      master -> master


Trouble Shooting:

Problem: You receive prompts for pass phrase or password,

Solution 1) Verify which ssh.exe you are using and that your id_rsa and id_rsa.pub files are located where that ssh.exe expects them. Especially if you are using cygwin.

Solution 2 ) Modify your git workspace .git/config file to point to the correct repository URL

The .git/config file is located in the project directory mentioned above for example; /home/pete/project/.git/config
          
           Manually: edit the file then look for the [remote "origin"] directive.
           Command Line: git remote set-url origin git@10.11.12.13:/opt/git/project

Solution 3) If you installed Tortoise Git
           By default Tortoise Git sets the system Environment variable GIT_SSH to something like this. C:\Program Files\TortoiseSVN\bin\TortoisePlink.exe. 
           
Reset/SET GIT_SSH system environment variable to:  

           C:\Program Files (x86)\Git\bin\ssh.exe

Windows7:  Control Panel -> System Properties -> Advanced -> Environment Variables

AND...

Open up Tortoise Git Settings -> Network
Remove  TortoisePlink.exe from the SSH CLient: setting
Some have had success just entering ssh.exe
Others have put the full path to: C:\Program Files (x86)\Git\bin\ssh.exe
Others have been successfull with the path to ssh.exe as installed by java.
            
Reboot/re-open a new git-bash window hopefully it worked. (this solution didn't work for me but did for other users)


Solution 4)Temporarily  Reset GIT_SSH in your shell
                  > export GIT_SSH="C:\Program Files (x86)\Git\bin\ssh.exe"

Solution 5) Permanently Reset GIT_SSH every time you open a shell.
                   Create a .bashrc file, and add the above export line
                  > cd ~
                  > vi .bashrc
                   export GIT_SSH="C:\Program Files (x86)\Git\bin\ssh.exe"
                 :wq
            

References:
   GIT Setting up the Server 

Wednesday, December 10, 2014

Setting up a Continuous Integration Environment with Jenkins and Docker PART 1.

As a proof of concept I was tasked with setting up a continuous integration environment using Jenkins, Docker, Maven, Artifactory, GIT, and a JDK 1.7 web application running on Tomcat. Additional requirements included using our own local Docker Hub and Docker Index. Final deployment will be to the cloud either AWS or Microsoft's Azure.

I began by creating four identical CENTOS Virtual Machines.  I probably didn't need 4 separate servers however I figured I would end up making mistakes and have to rebuild one or more of the servers during the project. Our lab environment has large servers runing VMware. I created the following four virtual servers.
  1. DockerJenkins
  2. DockerGIT
  3. DockerHub
  4. DockerArtifactory
I began by setting up the Jenkins Server.

Step 1) Add the Jenkins RPM repository to yum configuration, then install Jenkins

# wget -O /etc/yum.repos.d/jenkins.repo http://pkg.jenkins-ci.org/redhat/jenkins.repo
# rpm --import http://pkg.jenkins-ci.org/redhat/jenkins-ci.org.key
# yum install jenkins

....Lots of output .... 

Step 2) Verify Jenkins is installed and setup as a service.

# chkconfig --list jenkins
jenkins         0:off   1:off   2:off   3:on    4:off   5:on    6:off

# service jenkins
Usage: /etc/init.d/jenkins {start|stop|status|try-restart|restart|force-reload|reload|probe}

Step 3) Start Jenkins

# service jenkins start
Starting Jenkins bash: /usr/bin/java: No such file or directory
                                                           [FAILED]

OOPS we didn't install java.
Lets see what's available

# yum list available | grep java.
.... Lots of output here ...

# yum  install java-1.7.0-openjdk 

....Lots more output here  ...

Lets check to see if we've actually installed Java

# java -version
java version "1.7.0_71"
OpenJDK Runtime Environment (rhel-2.5.3.1.el6-x86_64 u71-b14)
OpenJDK 64-Bit Server VM (build 24.65-b04, mixed mode)

Now lets start Jenkins

# service jenkins start
Starting Jenkins                                           [  OK  ]


Lets make sure Jenkins is up and running. Open a browser and navigate to your server, port 8080.

WooHoo We did it!!!


In PART 2 we will discuss setting up a server to host GIT.


Tuesday, November 25, 2014

hrsd.yahoo.com

I recently noticed almost all my Yahoo news links re-directed me to hrsd.yahoo.com. Frequently these links freeze and never load. So I finally decided to do some investigation. The only thing I found that seemed reasonable was the following partial explanation;


...the hsrd.yahoo.com referrer is similar to r.search.yahoo.com, which publishers will also see. It processes click actions for the home page. As part of our move to HTTPS secure search, referrer logs are now showing hsrd.yahoo.com when the source site was HTTPS-based.
So if you are seeing a huge change in referrer data from Yahoo, that is why....

-Pete

No Space Left on Device

Issue: No Space Left on Device

Discussion:
I have a server which has been setup to capture uploaded crash logs. Every hour I transfer these files (using rsync) to another server for statistical analysis.  One of our end users noticed that the current day statistics were not as expected.  I manually ran the script and noticed the No space left on device error below.  At first didn't understand how I could be out of space when a df -h returned 14 Gigabytes free.  After a reboot, and a little Googling I realized that the system was out of available Inodes.  

For those new to Linux an Inode is simply a pointer to a file, or more precisely pointer or index to a block on a disk which contains either part of or all of a file. In the old days a writable block on a system might be 512 Kb, now it is typical to have a block size of 4096 Kb or even 8192 Kb.  If a file doesn't fit into a single block then the next available block is written to and the system "magically" keeps track of the next block. On my system each of these crash logs was very small, and over the previous 6 months we had over 1.6 million uploaded to the server each file took up one Inode, and eventually I ran out of Inodes even though I didn't run out of diskspace.

rsync: mkstemp "/usr/local/crashlogs/20141120/.20112014135212_0.log.MdO3DE" failed: No space left on device (28)
rsync: mkstemp "/usr/local/crashlogs/20141120/.20112014135217_0.log.qz7uz4" failed: No space left on device (28)
rsync: mkstemp "/usr/local/crashlogs/20141120/.20112014135219_0.log.73mgvu" failed: No space left on device (28)


#df -h
Filesystem                   Size  Used Avail Use% Mounted on
/dev/mapper/vg_tern-lv_root   26G   11G   14G  45% /

The out of disk space error was related to the lack of available Inodes.

#df -ih
Filesystem                  Inodes IUsed IFree IUse% Mounted on
/dev/mapper/vg_tern-lv_root   1.6M  1.6M     1  100% /

Solution:
  There are some versions of Linux, and file system types that will allow one to increase the number of available Inodes. Mine was not one of them.  One option would be to back everything up reformat the disk with more Inodes then restore the system.  This was not an option for me.  The final solution is to remove unnecessary files.  Lucky for me the end user didn't care about old data thus she gave me permission to remove three months worth of crash logs. This freed up over 500,000 inodes.


IF you don't know the directory that is causing you issues below is a one line script that can help you find the location of your many small files.

for i in /*;do echo $i; find $i | wc -l; done


Friday, October 25, 2013

Jenkins, Maven error: Target repository cannot be empty

After applying the previous three fixes (see my other recent posts) to my Jenkins instance my Maven builds were still failing. I hope these posts can help others.

Issue:

mavenExecutionResult exceptions not empty
message : Internal error: java.lang.IllegalArgumentException: Target repository cannot be empty
cause : Target repository cannot be empty
Stack trace : 
org.apache.maven.InternalErrorException: Internal error: java.lang.IllegalArgumentException: Target repository cannot be empty
....snip...
at org.jfrog.build.client.DeployDetails$Builder.build(DeployDetails.java:115)


Discussion:
After asking Uncle Google, I only turned up the jfrog code that returns the "Target repository cannot be empty" message.  After a little more prodding of Uncle Google, Uncle finally revealed that the Jenkins Artifactory Plug-in uses jfrog  JENKINS Artifactory Plugin. Now I had somewhere to look.  I looked at my Jenkins instance and attempted to set the Artifactory target repository, but the Artifactory plugin appeared to be corrupt, as I wasn't getting any place to enter the target repository. Thus it appeared that the Artifactory plugin was probably corrupt. This was most likely due to my need to downgrade Jenkins to an older version.


Solution:  I first attempted to use the Manage Plugin feature to uninstall the Artifactory plugin but it didn't actually remove it.  Thus I forcibly removed Artifactory Jenkins plug-in, by removing JENKINS_HOME/plugins/artifactory directory and the artifactory.jpi file. I believe there are still some xml files I need to hack but I'm finally back to building my software.


git: Failed to connect to repository

My Jenkins instance was failing to connect to a git repository using a supplied username and private key. The Credentials plugin appeared to be getting confused. I hope the following can help others avoid a bit of head banging against your desk.

Issue: 

Failed to connect to repository : Command "ls-remote -h ssh://myuser@repo HEAD" returned status code 128:
stderr: Permission denied, please try again. 
Permission denied, please try again. 
Permission denied (publickey,gssapi-keyex,gssapi-with-mic,password). 
fatal: The remote end hung up unexpectedly

Discussion: 

In my situation the Jenkins instances is pointing to several different repositories (svn and git)
The connection to the svn repository uses svn+ssh. The connection to the git repository ,using ssh, was failing. It appears that the Jenkins instance is having trouble figuring out which credentials to use or private key to use.


Solution: 
The solution is to define the private key to use for the user that is failing. I found the solution here at: stackoverflow  then modified for my situation.

Create a JENKINS_HOME/.ssh/config file to point to the correct private key.
Set permissions to 600 ( rw------- )
Set the contents of the file to:

Host source.server.com
HostName 123.456.789.012
User myuser
IdentityFile /home/jenkins/.ssh/id_rsa

Where: Host:            Can be anything is it just a place holder I generally use the DNS name 
                                 or short name of the server.
            HostName:    IP addresss or fully qualified domain name if you have DNS 
                                 enabled on your network
           User:             The user that will be connecting to the repo
  IdentityFile: The ssh private key that will be used to connect to the repository.
                                      In my case the user  and key are not the jenkins user and id_rsa. 

Finally: 

You must add the public key to your known_hosts file. The easiest way to add this is to execute: ssh myuser@source.server.com   
Then answer yes.

Alternatively if you have the public key you can directly edit your known_hosts file and paste the public key to the bottom of the file.